Flashing
To flash the firmware to the DIY-Thermocam, use the Teensy Loader that works under Windows, Linux and Mac OSX.
First, get the newest version of the firmware from here and extract the firmware.hex file from the zip archive to your computer.
Next, download the Teensy Loader from here and open it. Click the "Auto" button, or choose "Automatic Mode" from the Operations menu. The Auto button should illuminate bright green. Now load the firmware.hex file, it should show up on the bottom side of the GUI.
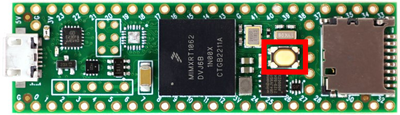
Press the button on the Teensy microcontroller while it is connected to your PC via USB to start the flashing procedure:
Afterwards, you should see the device rebooting with the logo on the screen.
Development
Use this guide if you want to make your own changes to the open-source firmware of the DIY-Thermocam. It should work on all common operating systems (Windows, Linux & macOS).
You need to have VS Code installed and download the zip archive of this repository. Then unpack the 3.0 folder inside the firmware subfolder, start VS Code and open this folder with File -> Open Folder.
PlatformIO should initialize itself automatically and you see the buttons to Build, Upload and Clean the project in the blue bar at the bottom. If this is not the case, set it up manually using the instructions provided here.
Before you click "Upload", make sure the Thermocam is connected to the PC via a micro USB cable and turned on. The Teensy CLI should then automatically detect it and flash the .hex file to the board. After a restart the changes should be present on the device.